Creating a CRUD React App with Next.JS and Redux
- Seiji Ralph Villafranca

- Apr 12, 2020
- 13 min read
Updated: Aug 8, 2021
React Applications are very fast and reliable, as a famous SPA framework, It is widely known as lightweight, easy to plugin and very easy to learn framework but there are times that our projects get bigger and bigger and this might lead to a messy and hard to maintain code, as projects gets complicated, the data we need to maintain is also getting complex, another downside is that React Apps are Client Side Rendered (CSR) like Angular and this might not be SEO friendly and it would take away the chance to be on top of Search engines like Google.
With these downsides for React, we are fortunate that several technologies now exists to make our developer life easier and we have our Redux and Next.JS.
Redux is a state management pattern that is used to manage data in a React application with the use of stores, this provides a single source of truth and allows the data to behave consistently. Redux is also used in other frameworks such as Angular in the form of Ngrx and this is very useful especially if we have large scale applications. I will explain this deeper as we move on to the development.
Next.JS by Zeit is framework based by React, Webpack and Babel, it is used to create React Applications with Server Side Rendering. to know more about Server Side Rendering (SSR) you can visit my tutorial here https://www.seijivillafranca.com /post/what-is-ssr-and-why-we-need-it-on-spa.
Setting up the Application
1.Installing the dependencies
now, let's move on in setting up our application, the first step is to create a folder on your terminal.
mkdir <folder-name>then lets initialize our root folder with a new npm package with the command
npm initthen in the root of your created folder, execute the command:
npm install --save react react-dom nextthis will install react dependencies and next js framework.
now we will install our dependencies in redux with the following command:
npm install redux react-redux next-redux-wrapper redux-thunk --saveWe will also install axios as this will be responsible for calling http requests
npm install axios --saveAnd lastly, let's install react bootstrap for UI
npm install react-bootstrap bootstrapAfter successfully installing all our dependencies, we will see in our folder project that there is a new package.json file where all downloaded dependencies with their versions are listed.
package.json
{
 "name": "next-app",
 "version": "1.0.0",
 "description": "nextjs tutorial",
 "main": "index.js",
 "dependencies": {
 "axios": "^0.19.2",
 "bootstrap": "^4.4.1",
 "next": "^9.3.4",
 "next-redux-wrapper": "^5.0.0",
 "react": "^16.13.1",
 "react-bootstrap": "^1.0.0",
 "react-dom": "^16.13.1",
 "react-redux": "^7.2.0",
 "redux": "^4.0.5",
 "redux-thunk": "^2.3.0"
  },
 "devDependencies": {},
 "scripts": {
 "test": "echo \"Error: no test specified\" && exit 1"
  },
 "author": "seiji villafranca",
 "license": "ISC"
}
we will add scripts here that we will use in running and building our react applications
 "scripts": {
 "dev": "next",
 "build": "next build",
 "start": "next start"
  },
2. Creating folder structure
the basic folder structure of next js is really simple, there are two vital folders in next which are pages and components but in our case we are using state management so we will also add a store folder in our root folder, we will also add assets folder that will hold our global styles, images, and other static files.
Our folder structure should now look like this.
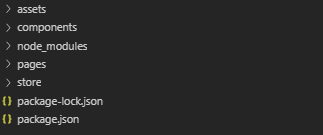
we have now our main folder structure, our next step is to create the files that we need to for out application to have a configuration and entry point.
3. Setting up _app.js and index.js and store
under pages folder, lets create two files named _app.js and index.js, we will also create styles.css under assets folder for our global css and lastly, we will create a store.js file under the store folder.
Our structure would now look like the following
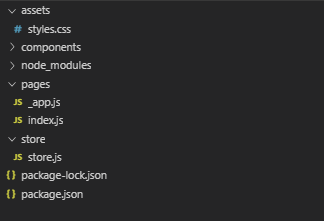
now we we will create our store, in the store.js file lets copy the following code:
import {createStore, applyMiddleware, combineReducers} from 'redux';
import thunkMiddleWare from 'redux-thunk';


const bindMiddleWare = (middleware) => {
 return applyMiddleware(...middleware);
}

export const initStore = () => {
 return createStore(
 // this is where all reducers go
 combineReducers({
        }),
 bindMiddleWare([thunkMiddleWare])
    )
}
in this snippet we have created two functions, the first function is the bindMiddleware() where it returns the applyMiddleware where it will apply thunk that will allow redux to handle actions which our not plain object.
the second function is the initStore() which will create our store, it returns the createStore() function that accepts two parameters, the first one is the cpmbineReducers() which will accept the list of reducers that we will create in the process of development, the second paramater is the bindMiddleware() function we have created, this is where we will apply thunk as our middleware.
Our next step is to copy this code in our _app.js
import '../styles/styles.css';
import 'bootstrap/dist/css/bootstrap.min.css';
import React from 'react';
import { Provider } from 'react-redux';
import withRedux from 'next-redux-wrapper'
import { initStore } from '../store/store';

const MyApp = (props) => {
 const {Component, pageProps, store } = props;
 return (
 <Provider store={store}>
 <Component {...pageProps}/>
 </Provider>
    )
}

export default withRedux(initStore)(MyApp);
the _app.js file is like our configuration file, this is where we import our global css files and other dependencies like bootstrap, we can see that the <Component.. has been wrapper with a Provider tag, this means that we are making the store available to all the components in our application and with the code export default withRedux (initStore) (MyApp); we are initializing what store that will be used in our application.
Now let's copy this code in our index.js file
import React from 'react';

class Index extends React.Component {
    render() {

        return (
          <div>
              <span>Hello World</span>
          </div>
        )
    }

}


export default Index;
this will be the entry point of our app, we will just display a hello world as our app is loaded. we created a class Index that returns a simple DOM.
now let's try running our app, in our terminal pointing at the root of our project execute the following command:
npm run dev this will run the devscript which we have added earlier (next start) and this will run our application under port 3000.
let's visit http://localhost:3000 and we will see the following page:
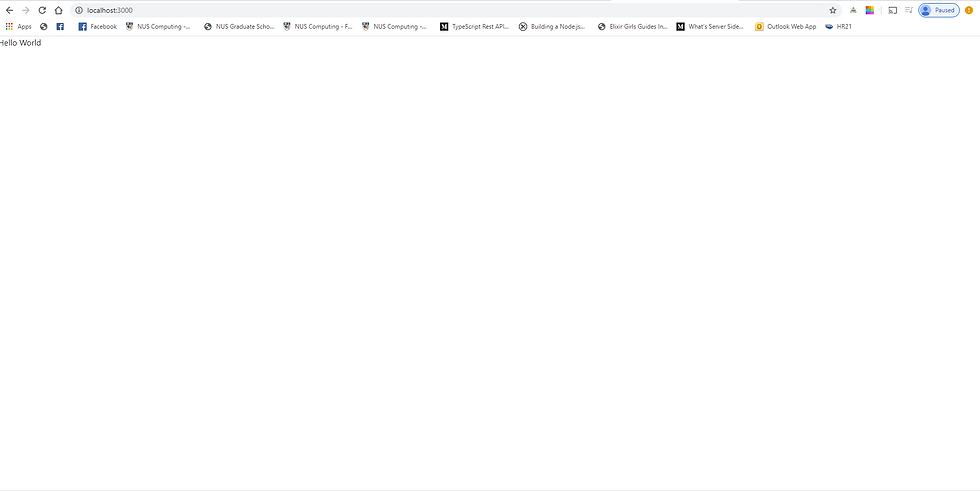
and that's it! we have successfully created our running Next.JS application, our next goal is to create a CRUD application with our initialized store, in this example, we will create a simple Blog application that will allow users to create update delete and view details of each Blog.
Developing a Simple CRUD with Redux
1. Creating Reusable Components
in this part we need to consider, what are the reusable components in our application and what are the pages or the smart components, in this case we need only two pages which is the list of all blogs (Index Page) and the Blog Form (use for creating, viewing and updating blog details), on the other hand, we can consider a Blog Item, Text Input and Header and Layout of the application as reusable components.
Components
Blog Item
TextInput
Header
Layout
Pages
Blog Form
Blog List (Index)
with these classification let us create BlogItem.js, Header.js and TextInput.js files under components folder and blogform.js in the pages folder, we don't need to create bloglist as index page will cater this feature.
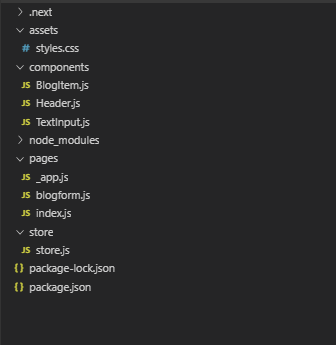
We will now create our Header Component (Header.js)
import Link from "next/link";

const linkStyle = {
 marginRight : 15
}
const Header = () => (
 <div>
 <Link href="/">
 <a style={linkStyle}>Home</a>
 </Link>
 <Link href="/about">
 <a style={linkStyle}>About</a>
 </Link>
 </div>
)

export default Header;
we can see that components are simple functions and does not extend React components as this will be only be used to display data in our application. in our Header component, we haves used a Link from next js that allow us to navigate from one page to another, the url name will also be the filename of the page.
Now we will create our Layout component (Layout.js)
import Header from "./Header";

const layoutStyle = {
 margin: 20,
 padding: 20,
 border: '1px solid #DDD'
}
const Layout = props => (
 <div style={layoutStyle}>
 <Header/>
 {props.children}
 </div>
)

export default Layout;
the layout component will be our standard layout on every page, this means that this will be used in every page will navigate, we have used Header component because .header should be present anywhere in our app. thee props.children is any component that will be a child of the layout component.
next is to create our TextInput Component (TextInput.js)
const TextInput = ({disabled, name,  value, label, onChange }) => {

 return (
 <div>
 <label>{label}</label>
 <input
 name={name}
 className="form-control"
 value={value}
 onChange= {onChange}
 disabled={disabled}
 >
 </input>
 </div>
    )
}

export default TextInput;
this will be later used in our blog form page, we have initialized several props such as disabled, name, value and label so we can pass values in our input component and an onChange event to allow other components to be aware of the TextInput event.
the last component we need to create is the BlogItem Component (BlogItem.js)
import Link from "next/link";
import { Button, Container, Row, Col } from 'react-bootstrap';
const BlogItem = ( {blog, onClick} ) => {
return (
<div>
<span>
<Container>
<Row>
<Col sm={4}><h3>{blog.title}</h3></Col>
<Col sm={4}><span>{blog.description}</span></Col>
<Col sm={4}>
<Button variant="primary" onClick={() => onClick({blog,
action:"view"})} > View Blog</Button>
<Button variant="primary" onClick={() => onClick({blog,action:
"edit"})} > Edit Blog</Button>
<Button variant="danger" onClick={() => onClick({blog, action
"delete"})}>Delete</Button>
</Col>
</Row>
</Container>
</span>
</div>
)
}
export default BlogItem;We used a simple bootsrap grid to display the blogs details in each column and w have provided a blog property where a single instance of blog should be passed and an onClick event that will be triggered if one action button will be clicked.
2. Creating actions and reducers for store
we have successfully created our reusable components, now our next step is to create the necessary actions and reducers to communicate with our endpoints and store, we know that we are creating a CRUD application, this means we need actions for the create, read update and delete we would also need an action that would store the list of all blogs available in our database and an action that would set the state of the form if it is being used for viewing, creating or updating a blog.
suppose we have the following endpoint:
GET http://localhost:4000/blogs  - get list of all blogs
POST  http://localhost:4000/blogs - create a new blog
PUT http://localhost:4000/blogs/{id} - update details of blog
DELETE  http://localhost:4000/blogs/{id} - delete blog
create a config.js file in your root folder and this is where we will place the url of our endpoint.
export const HTTP_ENDPOINT = "http://localhost:4000/";then we will create our actions. create a folder named blog under store and create a file named actions.js under the created blog folder.
import axios from 'axios';
import { HTTP_ENDPOINT } from '../../config';

export const blogActionTypes = {
 GET_ALL_BLOGS: 'GET_ALL_BLOGS',
 SET_FORM_STATE: 'SET_FORM_STATE',
 SET_SELECTED_BLOG: 'SET_SELECTED_BLOG'
}

export const getAllBlogs = () => {
 return dispatch => {return axios.get(`${HTTP_ENDPOINT}blogs`)
    .then(({data}) => data)
    .then(blogs => dispatch({type: blogActionTypes.GET_ALL_BLOGS, data: blogs}))
   }
}

export const saveBlog = (blog) => {
 return dispatch => { return
 axios.put(`${HTTP_ENDPOINT}blogs/${blog.id}`, blog)
    }
}

export const setSelectedBlog = (blog) => {
 return dispatch => dispatch({type: blogActionTypes.SET_SELECTED_BLOG, data: blog})
}

export const createBlog = (blog) => {
 return dispatch => { return axios.post(`${HTTP_ENDPOINT}blogs`, blog)
   }
}

export const deleteBlog = (id) => {
 return dispatch => { return
 axios.delete(`${HTTP_ENDPOINT}blogs/${id}`)
   }
}

export const setFormState = (state) => {
 return dispatch => dispatch({type: blogActionTypes.SET_FORM_STATE, data: state})
}
we have created a blogActionTypes object which will be used by our reducer later on to determine what to do with our state after an action has been dispatched.
The getAllBlogs() calls the http request GET http://localhost:4000/blogs that will get the list of blogs using axios and will dispatch the retrieved list of blogs with a type of GET_ALL_BLOGS.
the saveBlog() only calls an http request PUT http://localhost:4000/blogs/{id} that will update the specific blog with the provided id, it will not call any dispatch because we don't need to update any state after updating, this behavior is also the same with createBlog() and deleteBlog() function.
the setSelectedBlog() and setFormState() functions only calls a dispatch action, this means that we are only updating the state, we do not require any data from our database as we need to update what blog is selected and what is the current action being done in the form respectively.
Now lets create our reducers, create a reducer.js under the blog folder.
import { blogActionTypes } from "./actions";

const blogInitialState = {
 allBlogs: [],
 form: "",
 selectedBlog: null
}

export default (state = blogInitialState, action) => {
 switch(action.type) {
 case blogActionTypes.GET_ALL_BLOGS:
 return {
 ...state,
 allBlogs: action.data
        }
 case blogActionTypes.SET_SELECTED_BLOG:
 return {
 ...state,
 selectedBlog: action.data
        }
 case blogActionTypes.SET_FORM_STATE:
 return {
 ...state,
 form: action.data
        }
 default:
 return state;
    }
}
in the code above, we have created our initial state which is the blogInitialState, we can see three properties (allBlogs, form and selectedBlog) which there are initial values declared, this is where all our data will be stored if an action will be dispatched and the reducers are the only capable to edit the state of these properties.
on the previous creation of actions, the getAllBlogs() function dispatches an object with a type of GET_ALL_BLOGS, this will be redirected to the reducer and will fall on the first case which has a type of GET_ALL_BLOGS, the { ...state, allBlogs: action.data} simply updates the value of the allBlogs state with the list of blogs retrieved in the database.
After creating the reducer, we should not forget to add the reducer in our store.js
import {createStore, applyMiddleware, combineReducers} from 'redux';
import thunkMiddleWare from 'redux-thunk';
import blogs from './blog/reducer'
const bindMiddleWare = (middleware) => {
 return applyMiddleware(...middleware);
}

export const initStore = () => {
 return createStore(
 // this is where all reducers go
 combineReducers({
        blogs
        }),
 bindMiddleWare([thunkMiddleWare])
    )
}
And we have successfully created our reducers and actions, our next step is to connect our store with our components.
in this step, will now create our view where we will list all the available blogs, we will place our code in the index.js so as the app is loaded in the home page, we will see a list of blogs in the page.
the first thing we need to do is connect the props of the component to the value of our states in store, in order to achieve this we will add the mapStateToProps() and mapDispatchToProps() function
import { connect } from 'react-redux'
import { bindActionCreators } from 'redux'
class Index extends React.Component {
 render() {
      return ( <Layout> ... </Layout>)
    }
}
//mapStateToProps and mapDispatchToProps here
const mapStateToProps = (state, ownProps) => {
 return {
 blogs: state.blogs.allBlogs
    }
}

const mapDispatchToProps = (dispatch, ownProps) => {
 return {
 actions: bindActionCreators(Object.assign({}, blogActions), dispatch),
    }
}

export default connect(mapStateToProps, mapDispatchToProps)(Index);
The mapStateProps() simply maps the value of the allBlogs state in he blogs property of the Index components while the mapDispatchToProps() uses bindActionCreators() which binds all the available actions in the blogActions.
Our next step is to call the getAlloBlogs() action and display the list.
import { Button } from 'react-bootstrap';
import Layout from "../components/Layout"
import BlogItem from '../components/BlogItem';
class Index extends React.Component {
  render() {
    const { blogs } = this.props;
    return (  <Layout>
                <div>
                  {blogs.map(blog =>{
                    return (
                      <BlogItem key={blog.id} blog={blog} onClick=
                       {(data) => this.selectBlog(data)}></BlogItem>
                          )
                    })}
                </div>

                <Button style={button} onClick={(data) =>
                this.selectBlog({blog: null, action: 'create'})}>Create
                 Blog</Button>
               </Layout>
            )
         }
  componentDidMount() {
       this.props.actions.getAllBlogs();
    }

 }


    }
the componentDidMount() is a lifecycle where it states that component is already rendered in the DOM, we will call the this.props.actions.getAllBlogs() here to retrieve the list of blogs, remember that we have binded the actions in blogActions to the actions props of Index using bindActionCreators, this means that we can call the getAllBlogs() action in the this.props.actions.
on the render() function we have added a blogs.map which will iterate the list of blogs from the blogs property and each blog instance will passed in our BlogItem component that we have created, we have created an onClick event which call a selectBlog() that we will create in a while.
our last step is to create our selectBlog() function that will redirect us to the blogform page and determine which action is to be done with the blog.
import Router from 'next/router'
class Index extends React.Component {
  constructor(props, context) {
      super(props, context);
      this.selectBlog = this.selectBlog.bind(this);
  }
  render() {
    const { blogs } = this.props;
    return ( <Layout>...   </Layout>)
  }
  componentDidMount() {
    this.props.actions.getAllBlogs();
   }

  selectBlog(data) {
      if(data.action === "delete") {
          this.props.actions.deleteBlog(data.blog.id).then(() => {
               this.props.actions.getAllBlogs();
          });

          return;
       }
    this.props.actions.setSelectedBlog(data.blog);
    this.props.actions.setFormState(data.action);
    Router.push('/blogform')
    }
 }    }
the selectBlog() will receive an object {action: <action.type>, blog: <bloginstance>}, if the action is delete, we will call the deleteBlog() action and this will call the delete endpoint and we need to refresh the list having to call getAllBlogs() action to update our list, if the action is create view or update, we will set the state of the selectedBlog with the blog instance and the form state with the passed action and will redirect the application in the blog form page.
we should also bind in the selectBlog() function in the constructor so the component will be able to access the function.
Now our code in index.js should look like this.
import React from 'react';
import Layout from "../components/Layout";
import { connect } from 'react-redux'
import { bindActionCreators } from 'redux'
import * as blogActions from '../store/blog/actions';
import BlogItem from '../components/BlogItem';
import Router from 'next/router'
import { Button } from 'react-bootstrap';
const button = {
 marginRight: "0px",
}
class Index extends React.Component {
 constructor(props, context) {
 super(props, context);
 this.selectBlog = this.selectBlog.bind(this);
    }
 render() {
 const { blogs } = this.props;

 return (
 <Layout>
    <div>
       {blogs.map(blog =>{
          return (<BlogItem key={blog.id} blog={blog} onClick={(data)=>
                   this.selectBlog(data)}></BlogItem>
                 )
         })}
    </div>
    <Button style={button} onClick={(data) => this.selectBlog({blog:
    null, action: 'create'})}>Create Blog</Button>
 </Layout>
        )
    }
 componentDidMount() {
 this.props.actions.getAllBlogs();
    }


 selectBlog(data) {
 if(data.action === "delete") {
 this.props.actions.deleteBlog(data.blog.id).then(() => {
 this.props.actions.getAllBlogs();
            });

 return;
        }
 this.props.actions.setSelectedBlog(data.blog);
 this.props.actions.setFormState(data.action);
 Router.push('/blogform')
    }

}


const mapStateToProps = (state, ownProps) => {
 return {
 blogs: state.blogs.allBlogs
    }
}

const mapDispatchToProps = (dispatch, ownProps) => {
 return {
 actions: bindActionCreators(Object.assign({}, blogActions), dispatch),
    }
}

export default connect(mapStateToProps, mapDispatchToProps)(Index);
run our application and visit localhost:3000 and we should see our page with the list of blogs.
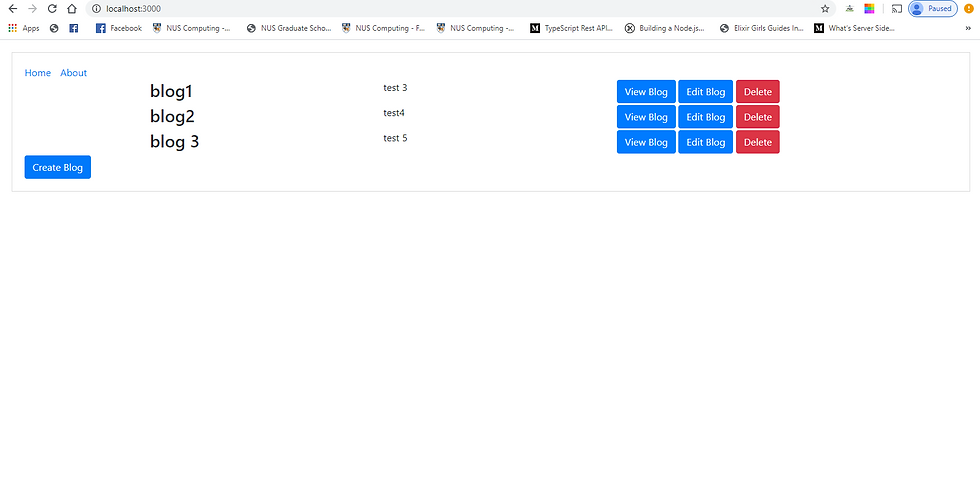
and we have successfully connected our components with Redux! Our last goal is to make our blogform working for updating viewing and creating a blog.
We will repeat the same step as we did in creating the index.js view, we will connect the blogform page into our store but in this case, we need the selectedBlog and form state.
const mapStateToProps = (state, ownProps) => {
 return {
 selectedBlog: state.blogs.selectedBlog,
 form: state.blogs.form
    }
}

const mapDispatchToProps = (dispatch, ownProps) => {
 return {
 action: bindActionCreators(Object.assign({}, blogActions), dispatch)
    }
}


export default connect(mapStateToProps, mapDispatchToProps)(BlogForm)
then we will create the form using he TextInput component we created.
constructor(props, context) {
 super(props, context);
    this.state = {
       selectedBlog: Object.assign({}, this.props.selectedBlog)
        }
    this.submit = this.submit.bind(this);
    this.updateState = this.updateState.bind(this)
  }

 render() {
    const {form} = this.props;
    let editableForm = false;
    if(form === 'view'){
        editableForm = true;
     }
     return (
       <div className="blogpage-container">
         <TextInput name="title"
         onChange={this.updateState}
         value={this.state.selectedBlog.title ?
         this.state.selectedBlog.title : ""}
         label="Title"
         disabled={editableForm}
          >
         </TextInput>

         <TextInput name="description"
         onChange={this.updateState}
         value={this.state.selectedBlog.description ?
         this.state.selectedBlog.description : ""}
         label="Description"
         disabled={editableForm}
          >
         </TextInput>
         <br></br>
         {form !== 'view'?<Button onClick={() => this.submit()}>Save
         Blog</Button> : ''}
         </div>

        )
    }
     submit() {
        if(this.props.form == 'create') {
          this.props.action.createBlog(this.state.selectedBlog).then(()
              => {
                   Router.push("/");
                 });
        } else if(this.props.form == 'edit') {
           this.props.action.saveBlog(this.state.selectedBlog).then(()
              => {
                   Router.push("/");
                 });
         }

    }

    updateState(event) {
       let field = event.target.name;
       let selectedBlog = Object.assign({}, this.state.selectedBlog)
       selectedBlog[field] = event.target.value;
        return this.setState({selectedBlog});
    }
In the constructor, we have connected the selectedBlog property which holds the value of the selectedBlog state in the store with the own state of the component, we have used form state to determine if the fields are disabled, if it is in view state, we know that the blog should not be edited and all fields cannot be modified.
We have provided the onChange event on TextInput component which will trigger the updateState() function, this would update the value of the selectedBlog state in our component using the setState(), remember to use Object.assign as we cannot edit the component state directly as this is immutable.
And lastly the submit() function will call the saveBlog() or createBlog() action depending if the state of the form is create or update.
And now, our blogform.js should look like this:
import React from 'react';
import { connect } from 'react-redux'
import TextInput from '../components/TextInput';
import { bindActionCreators } from 'redux';
import * as blogActions from '../store/blog/actions';
import { Button } from 'react-bootstrap';
import Router from 'next/router';
class BlogForm extends React.Component {
 constructor(props, context) {
    super(props, context);
    this.state = {
       selectedBlog: Object.assign({}, this.props.selectedBlog)
     }
    this.submit = this.submit.bind(this);
    this.updateState = this.updateState.bind(this)
  }

 render() {
    const {form} = this.props;
    let editableForm = false;
    if(form === 'view'){
       editableForm = true;
     }
    return (
        <div className="blogpage-container">

           <TextInput name="title"
           onChange={this.updateState}
           value={this.state.selectedBlog.title ?
           this.state.selectedBlog.title : ""}
           label="Title"
           disabled={editableForm}
           >
           </TextInput>

           <TextInput name="description"
           onChange={this.updateState}
           value={this.state.selectedBlog.description ?
           this.state.selectedBlog.description : ""}
           label="Description"
           disabled={editableForm}
           >
           </TextInput>
          <br></br>
          {form !== 'view'?<Button onClick={() => this.submit()}>Save
          Blog</Button> : ''}
           </div>

        )
    }

 submit() {
    if(this.props.form == 'create') {
       this.props.action.createBlog(this.state.selectedBlog).then(() =>
       {
           Router.push("/");
        });
     } else if(this.props.form == 'edit') {
          this.props.action.saveBlog(this.state.selectedBlog).then(()
         => {
            Router.push("/");
        });
     }

    }

 updateState(event) {
     let field = event.target.name;
     let selectedBlog = Object.assign({}, this.state.selectedBlog)
     selectedBlog[field] = event.target.value;
     return this.setState({selectedBlog});
 }

}


const mapStateToProps = (state, ownProps) => {
    return {
       selectedBlog: state.blogs.selectedBlog,
       form: state.blogs.form
    }
}

const mapDispatchToProps = (dispatch, ownProps) => {
    return {
       action: bindActionCreators(Object.assign({}, blogActions),
       dispatch)
    }
}


export default connect(mapStateToProps, mapDispatchToProps)(BlogForm)
And that's it! we have created our simple CRUD Application With React, Next and Redux.
for the working code I have provided a repository in my Github: https://github.com/SeijiV13/next-app-tutorial
Note* have provided a db.json that can be used with json-server to create mock endpoints similar to my examples, just run json-server --watch db.json on the root project, if you dont have json-server, you can install by running the command npm install -g json-server


Comments